After reading this paper, I hope you will be able to create a good CBQ/HTB setup and you understand what you created. For further reading, I recommend the Lartc HOWTO and of course the other pages on this site.
I write this paper so you understand how you can create a good setup. This means you know what you are doing and you can create your own script. I hope this will be a guide for the people new to tc. And I also hope that the more experienced reader will find something useful in it.
When I say tc, I mean Traffic Control in general. But tc is also the command line tool that is used to make the changes in the Linux kernel. This command is one of the commands of the iproute package (the other important command is ip). You can install the package that comes with your distribution, or you can compile and install it yourself (You can find a link here. And of course, you need a Linux box. I suggest you take a 2.4.x kernel and you enable all QOS options if you compile the kernel yourself.
It's very important to understand that you can only shape outgoing traffic. With the tc command, you change the outgoing queue. When a packet is sent, it's placed in the queue and the packets in the queue will be sent as fast as the link allows. By default, this is a FIFO (First In First Out) queue.
By changing the order of the packets in this queue, we can give some packets a higher priority by putting them as the first packet in the queue. This way, we can create order in the chaos of the packets that are send. We can do this by replacing the default queue with another, more advanced queue. For tc, this is called a qdisc (queueing discipline). The qdisc attached to the device is the root qdisc and there is only 1 root qdisc / device.
Some qdiscs are classful. That means they can have classes attached that contains parts of the traffic. It's possible to specify different rates, maximum bandwidth and priority's to this classes. That way, you can control the bandwidth like you want. You can put any traffic in any class you want with powerful filters.
There are some ways to control incoming traffic. You can use the classless qdisc ingress. This qdisc catches all incoming packets on a device. But you have to use the police of the filters to limit traffic. Not so powerful as a CBQ/HTB setup.
For those who really want to shape incoming bandwidth, there is also a patch so you can create a special IMQ device. You can redirect packets with iptables to this device and you can do this when the packets enters or leave the box. You can add a HTB/CBQ qdisc on this device so you can control incoming traffic. It's also possible to redirect traffic from multiple real devices to this imq device and even incoming and outgoing traffic to the same imq device. So you can really do fancy stuff with it (a link can be found here).
The elemens of this setup are classes and qdiscs. This elements have a parent-child relation. There is only 1 parent per class or qdisc, but a class can have more than 1 child. If you know this parent-child relation ship, you can create a hierarchical setup.
To represent this, you can imagine yourself a tree. For easy representation, I turn the tree upside down. So the traffic flows from the top to the buttom.
The trunk represents the maximum bandwidth you can get on the link and is the root qdisc for tc. Each branch can use the bandwidth of its parent branch and is called a class. If you want, the branch can borrow unused bandwidth from the parent branch. Traffic that flows in a class, is tied to this class. When two classes contain traffic and they have the same parent, they are considered as a single stream for the remaining of the tree.
Traffic is placed in a class with a filter. Each branch can have filters attached to it. When a packet enters the branch, the filters are tested and the packet can be redirected to the destination branch.
If you travel the diagriam from up to down, each time you have a class that leaves, the filters attached to that class are tested. If a filter match, the packet is placed in the destination class. You can't jump back with filters. The packet is tested agains the fiters until it reaches a class with no further classes attached to it.
This tree is a representation of the traffic shaping we do on your NIC. But there is also a queue on the link itself. Most of the time this is a cable or other modem. To be sure that this queue is not used to store the packets and disturb our setup, we have to make sure this queue is never filled up. We can do this by making the maximum bandwidth we send a little smaller then the maximum bandwidth we can get.
I suggest you take 98% of the real bandwidth as the bandwidth of the trunk. After you finished this setup and you can shape the bandwidth, you can try to go to 99% or even 100% and see what happens. Maybe it will work for you. We loose some bandwidth, but we win the possibility to shape the bandwidth.
Fist of all, you need to know what you can do with the classes. For this, I will explain some basic setups. Once you know how you can work with this classes, you can try to create your own tree. Each time a branch splits in new branches, you can determine how many traffic flows in each branch. And you can specify if the branch can borrow unused bandwidth from it's parent.
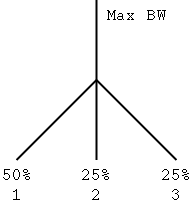
So we have three branches. Branch 1 gets 50% and branch 2 and 3 gets 25%. When there is enough traffic in the three classes, they will fairly divide the traffic : 50% - 25% - 25%.
When there is no traffic in class 1, class 2 and 3 will get each 50% of the available bandwidth. When there is no traffic in class 2, class 1 will get 66% ( 50/(50+25) ) of the available bandwidth and class 3 33%.
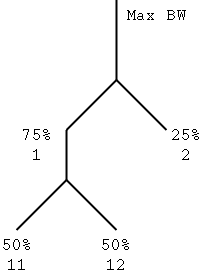
This is a similar setup, but with more branches :
Traffic in all classes : class 11 and 12 gets 50%, class 2 gets 25%
Traffic in class 11 and 2: class 11 gets 75% and class 2 gets 25%
Traffic in class 11 and 12: class 11 gets 50% and class 12 gets 50%
You can also say that class 2 gets minimum 25% of the available bandwidth while the rest is shared by class 11 and class 12. This can be useful if you want to have a minimum bandwidth for a class.
We still have to put the traffic in a certain class. You can do this with filters. This filter will be attached to the root qdisc and traffic that match the filter, is putted in a class. You can use as many filters as you want to put the traffic in a class. But once a filter matches, all other filters are skipped.
You can match allmost everything you want. The most powerful is the u32 filter. This filter can match to each possible bit you want in a packet. Another more easy to use filter is the fw filter. This filter can match agains matches that are added with iptable/ipchains so is very easy if you allready have a firewall running.
For more information on the filters, you can read the Lartc HOWTO. I will only explain the fw filter.
If you want to shape the bandwidth on a firewall, you can use this filter in combination with the iptables/ipchains tools. If you don't have a firewall, you can still use this filter.
When you mark a packet, you can use this mark with the fw filter. This means you can use all the options in the firewall tools to split the traffic.
iptables -A OUTPUT -t mangle -p tcp -j MARK --set-mark 1
tc filter add dev eth0 parent 10: protocol ip prio 3 handle 1 fw classid 10:2
This 2 commands will match all tcp packets and put them in class 10:2. You can also mark with ipchains.
ipchains -A output -p tcp -m 1
tc filter add dev eth0 parent 10: protocol ip prio 100 u32 match ip dst 192.168.1.254 match ip dport 2001 0xffff flowid 10:2
You can use the ip-address and the port of the source and the destination of the packet. You attach the qdisc to the root qdisc with the parent option and you specify the destination class with the flowid option. In this case all traffic to 192.168.1.254 and to port 8193 (= 2001 hex) will be matched (0xffff is a mask).
You can use as many matches as you want. You can also use as many filters as you want to put the traffic in the classes. First filter that match the traffic will be used and the other filters will be skipped.
I'm going to create a script that can be used as a start to create you own. For the qdisc, you can use CBQ or HTB. For HTB, you need to patch kernel and tc, but the HTB qdisc is easier to set up. I will also provide the commands for the htb qdisc.
More information on HTB can be found on HTB Homepage.
tc qdisc del dev eth0 root
We have to be sure there are no remaining settings. That's why we delete everything. Deleting the root qdiscs deletes also the classes and filters.
tc qdisc add dev eth0 root handle 10: cbq bandwidth 10mbit avpkt 1000
The root qdisc is attached directly to the NIC. This qdisc contains all traffic. We have to create this qdisc so we can attach all the classes to it.
The option bandwidth we have to provide, has nothing to do with the link bandwidth. This option is used for the internal sharing algorithm and you need to provide the NIC bandwidth. This is usually 10 or 100 mbit.
Handle 10: gives the root qdisc the number 10. You have to provide this so you can specify this root qdisc in the commands. The other options are just needed.
tc qdisc add dev eth0 root handle 10: htb
tc class add dev eth0 parent 10: classid 10:1 cbq bandwidth 10mbit rate 128kbit allot 1514 maxburst 20 avpkt 1000 bounded prio 3
This is the first class we create. For each class, you have to specify the parent. This is the number of the class or qdisc where it's attached to. Each class is his own number and this is specified with the classid option. Remark that the first part of this number is always the same and is equal to the qdisc where the class is attached to.
The rate we give to the class, is the bandwidth that this class may get. Of course, it will have to share this bandwidth with the other classes. This bandwidth must be smaller then our link bandwidth so WE are the bottleneck and not the modem.
The bounded option is used to tell the class it may not get more than it's rate. We use this option so this class is bounded to the link bandwidth.
The bandwidth is the bandwidth of the NIC and is for each class and qdisc the same and is equal to the device bandwidth. Allot, maxburst, avpkt and prio are options we give and we don't change.
tc class add dev eth0 parent 10: classid 10:1 htb rate 128kbit
You can create as much classes as you want. You have to know the parent and the bandwidth these classes may get. You can specify the bounded option to bound all the traffic that flows in this is class to the rate of the class. When you know how you want to shape the traffic, you have to try to create a tree so you can create all the classes you need.
For htb, you have the specify the ceil option if you want to bound class. By default ceil = rate.